Project Management - Save Options
Save Options
| Save a set of results | What data formats can I use? | |
| How do I specify location for saving data |
More about Save Options.
See section "Saving your Results" in chapter 1, "SRS Quick Tour", of the SRS User Guide for how to use this page.
You can also save a complete project. To do this you need to use either the Project Manager page for temporary projects or the Project Manager page for permanent projects.
Saving Results - Tasks
Save a Set of Results
Note: You can only save one set of results at a time. If more than one set is ticked when you click save SRS will indicate (on the Save Options page) which set is being saved.
- Select the location to which the information is to be output, using the Output To: options: typically the Browser Window (HTML) or a File (Text).
- Select the format to be used for your output information, using the Save As: options. These include ASCII text/table, Generic XML format and Specific XML format.
- Complete the required information for your chosen format.
- Click

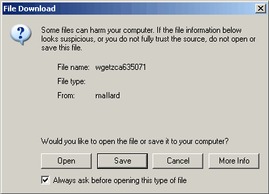
Figure 2.1 The File Download dialog box.Note: Dialog boxes shown throughout this document were generated in the Windows 2000 version of Internet Explorer 6. The dialog you see may look different depending on your system and web browser.
- Click the
 button.
 - Choose a location for the file and type in a suitable name.
- Click the button to save the file.
- Click the
 button on the Download Complete dialog, if necessary.
Saving Results - Worked Examples
Saving a Set of Results
SRS allows you to save queries so you can use them later.
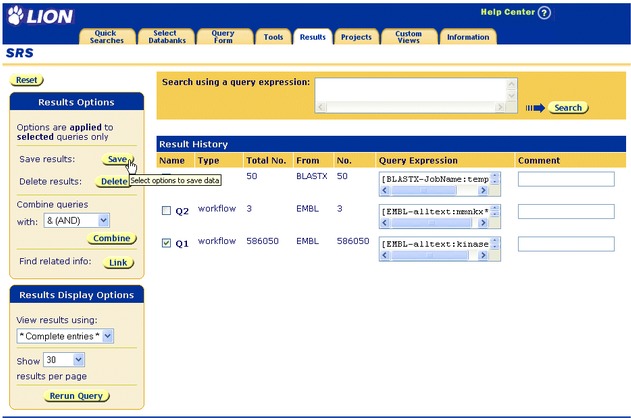
Figure 2.2 Select a query to save.
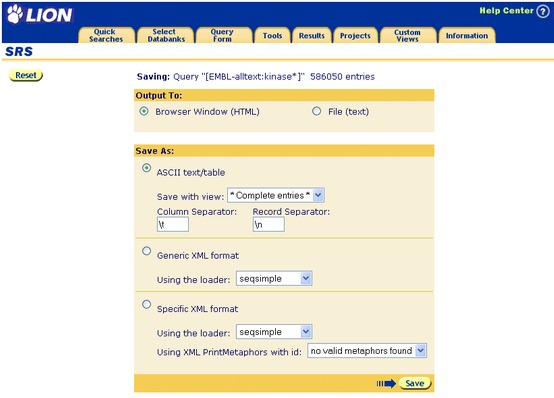
Figure 2.3 Set the save options on the Save Options page.
- Click the button. Your browser's File Download dialog box ( Figure 2.1 ) will be displayed.
Figure 2.4 The File Download dialog box.Note: Dialog boxes shown throughout this User Guide were generated in the Windows 2000 version of Internet Explorer 6. The dialog box you see may look different depending on your system and web browser.
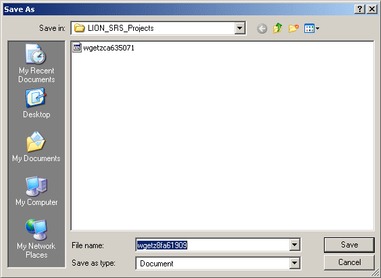
Figure 2.5 The Save As dialog box.
- Select a location for the file, choose a suitable name.
- Click the button to save the file.
- Click the button on the Download Complete dialog, if necessary.
Saving Results - FAQs
What Data Formats Can I Use?
You can save data to the screen (Browser Window) in HTML format. This is useful to see what the output from your file will look like. You can save your data as a text file which can be used later.
In either case you can choose the way data is formatted within the browser window/file using the Save As: options. Available options are:
- ASCII text/table:
- This format outputs raw date in ASCII format, with no HTML tags, etc. included. It is very useful for copying and pasting into other applications etc.
- Generic XML format:
- This format produces output which is useful if you only want XML and the exact format is unimportant. The XML tags will be based on those used in the loader. This format could be used in conjunction with an XSLT style sheet to transform the generic XML output into other formats, e.g. standard bioinformatics formats or HTML. Exporting data to a generic XML format does not require any additional input from the user.
- Specific XML format:
- This format allows the administrator to create more particular mappings between fields and tags so that specifically formatted XML can be created. Before this data format conversion can be performed, the user must create and register a set of XMLPrintMetaphor objects that provide a mapping between the attributes of a particular loader and the XML elements and attributes in the target format
Where Will My Data be Saved?
When you have chosen to save as a File (text) and chosen the formatting options, a File Download dialog will be displayed. Clicking will display the Save As dialog and this will allow you to choose a location to save your file.
Save Options - Reference
Figure 2.6 Save Options page.
Getting to the Save Options Page
This page can be reached by clicking the button from a page containing results or entries.
Options Area
Save
The button tells SRS to save the data using the chosen format.
Data Area
Saving
The queries or entries being saved This field is used to indicate the query that is being saved.
Save With View
You can use one of the predefined views to save the results. There is a drop-down list containing the currently available views.
Output To:
You can save your data to a file, or write it to the screen (browser window).
Save As Type
The radio buttons allow you to specify that you want to save the data using a Generic XML format, or a Specific XML format, or as ASCII text/table.
If you choose to save as ASCII text/table you must also define a Column Separator and a Record Separator to control the way the data is formatted.
Column Separator
If the results are to be saved as a table you can specify the character to be used as the column separator. This option does not apply to XML.
Record Separator
If the results are to be saved as a table you can specify the character to be used as a record separator. This option does not apply to XML.
Other Information
