Using Views
See "Views" - Chapter 5 for more information.
SRS allows you to customize the way in which you display data. This is usually done using the View Manager pages, although simple view creation is also possible from both of the Query Forms (see section "Creating Views from the Query Forms").
Creating a View
- Click the Custom Views tab to display the View Manager page 1. On this page you can select databanks and choose a name for your customized view. See Figure 1.11
- Give your view a name by typing it in the View name box. This example uses the name myTestView.
- Use the Display results as options to indicate whether you want to create a table or list view.
- In the Show fields from: options, indicate whether you want to be able to select fields from all of those available for your chosen databanks, or only common fields.
- In the list under Databanks to define a view for, click SWISSPROT to select it.
- In the list under Databanks to be linked to click EMBL.
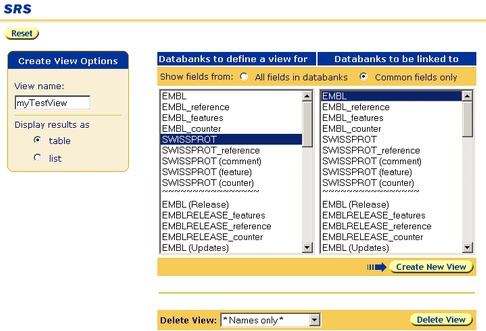
Figure 1.11 Create your own views (Steps - ).
- Click the
 button to display the View Manager page 2 from which you can select the fields for your views (see Figure 1.12 ).
 - Choose the fields you want to view by ticking the check boxes beside them. For the purpose of this example, select the Description field for both databanks.
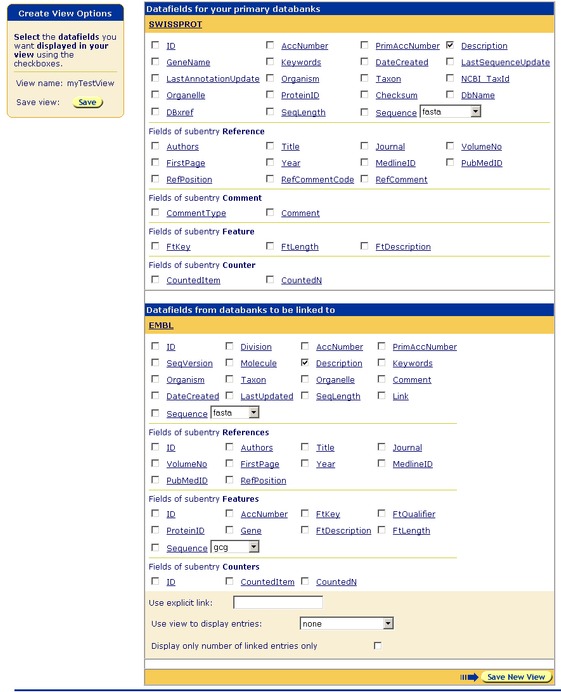
Figure 1.12 View Manager page 2.
- Click the
 in the Create View Options box to save your view.
Your view will be saved and you will be returned to the View Manager page 1, where you can create more views.
in the Create View Options box to save your view.
Your view will be saved and you will be returned to the View Manager page 1, where you can create more views.
Applying a View
- Click the Results tab to get to the Manage your Query Results page.
- Choose a set of results that you wish to view, e.g. by ticking the check box beside them (on the Manage your Query Results page). See Figure 1.13 Tick the check box beside the query labelled Q1. This was the first query you made (hence Q1).
- Select myTestView from the drop-down list in the Results Display Options box.
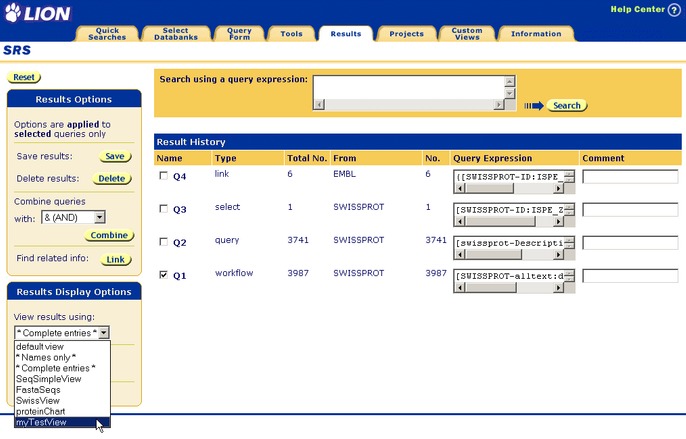
Figure 1.13 View a set of results using your own view.
- Click the
 button to display the query result set, Q1, using myTestView. The entries in Q1 will be displayed using the view you selected.

Figure 1.14 Query Result page showing typical SWISS-PROT entries and any linked EMBL entries, shown using myTestView.If you cannot see any entries with links, try looking for the entry for which you found the original link. If you had to try linking to a databank other than EMBL, you may want to create a view that will show SWISS-PROT and your chosen databank, rather than SWISS-PROT and EMBL. (Do not worry, at this stage, if you cannot find your result.)
Deleting a View

Figure 1.15 Selecting a view to delete.
- Click the
 button.
