Using the Project Manager
These functions are described below.
Note: Some functions, namely creating a new project, switching to other projects, deleting and renaming projects, are not available for temporary projects.
Creating a New Project
Note: This feature is not available for temporary projects.
To create a new project:
- Click the
 button.
Switching to Another Project
Note: This feature is not available for temporary projects.
To return to a project that you have already saved:
- From the Project Manager page, select the project you want to resume from the drop-down list in the Other Projects box.
- Click the
 button.
The project you have just selected is now displayed on the Project Manager page. You can work with this project as usual.
button.
The project you have just selected is now displayed on the Project Manager page. You can work with this project as usual.
Copying Project Information
Note: This option will only be available if you have more than one project in your account. This option is not available for temporary projects.
To copy project information:
- Make sure you are in the project from which you want to copy items (see section "Switching to Another Project"). Select the items you wish to copy by ticking the check boxes beside those items.
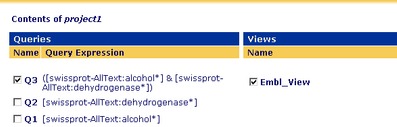
Figure 2.7 Choosing items to be copied.
- Choose the project to which you want the items to be copied using the drop-down list in the Project Options box:
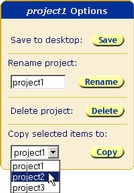
Figure 2.8 Choosing a project to which to copy items.
- Click on the
 button to copy the items.
Saving a Project
To save a project:
- Make it the current project. (See section 2.4.2 "Switching to Another Project" )
- Click the
 button, in the Project Options box.
 - Select Save this file to disk when prompted.
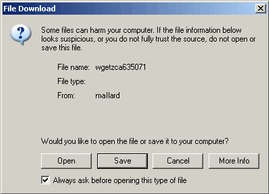
Figure 2.9 File Download dialog.
- Click

- In the Save As dialog box, give the project file a name.
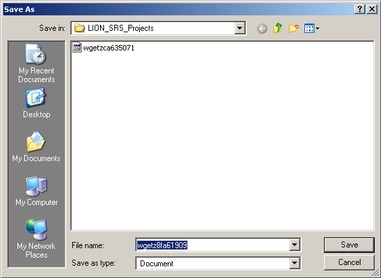
Figure 2.10 Save As dialog.Note: It is better not to include spaces and other special characters in names as some systems do not handle them properly. Use an underscore, or start new words with a capital letter instead.
- Click
The file is now saved and the system is ready to save another project, if you wish.
Opening a Saved Project
 button in the Other Projects box on the Project Manager page.
To open a project from your local disk:
- Type the file name in the text box beside the
 button, or use the button to help locate your project.
 - Click the button.
This will open the project, and you can start working with the project as usual.
Deleting a Project
Note: This feature is not available for temporary projects.
To delete a project:
- Set the project that you want to delete as the current project. (See section 2.4.2 "Switching to Another Project" )
- Click the
 button.
Renaming a Project
Note: This feature is not available for temporary projects.
To rename a project:
- Type a new name in the Rename project: text box in the Project Options box.
- Click the
 button.
The page will be refreshed showing the new project name.
button.
The page will be refreshed showing the new project name.

Figure 2.11 Personalized project names.All the work you do using SRS will be within projects. These are simply a way of keeping related work together, and any queries, views, etc. that are created in a project will be stored in the project history. This chapter introduces SRS projects. By the end of this chapter you will have learned more about:
- The benefits of using temporary and permanent projects.
- How to start or return to a project.
- Features that are available in permanent projects.
- How to make temporary project data available in other projects.
- How to move temporary project work to a permanent project.
